Pages (Click Here to Visit)

Showing posts with label Debbie Mumm. Show all posts

Monday, February 11, 2013

A New School Year

Hello Everyone,

Well, here we are at the start of another school and working week for a lot of us. In Victoria, it will be the start of our second full week of school.
Accordingly the title of my post and layout today....A New School Year!

Over the holidays (which seem a distant memory now) I was reading Creating Keepsakes Jan/Feb 13 - one layout stood out by Piradee Talvanna......it was a layout with many 'Lift Up Flaps' and layers. I decided to give it a go this month for my second post and share it with you all.

I have decided to do this as a bit of a step by step post so that you can see the layout come together. So here goes...

This layout is perfect when you have several photos but also if you would like to hide some journalling and present what appears to be a basic single page layout. It is really important if you are using double sided papers (highly recommended) to really think about what each layer will look like. You will understand what I mean soon.

This layout is of Brayden's first day in Grade One....I had 3 photos that I wanted to use and limited space on a single page layout. I loved how with this layout I could highlight that gorgeous photo of him on the top of the layout.

Here is the layout...

You will need: 1 x cardstock for backing; Several coordinating patterned papers; cardstock for mounting and other embellies; Lettering; punch (I used a binding edge punch); embellishments. I have used the Creative Imaginations - Debbie Mumm papers - School Borders; Art Class; School Phrase and Smart Owlic.

Step #1: Cut a frame from your cardstock. Why? So that you are not wasting the centre of your cardstock when you put patterned paper over it. It also reduces the thickness of your layout and that is something to be particularly conscious of with this layout. My frame was a 2cm frame.


Step #2: Backing patterned paper - select and trim.  I cut 6mm off 2 edges only. Hence not a large cardstock border.

Step #3: Select and cut your patterned paper pieces for each of the larger layers.
You will need:
1 x 18cm x 24cm; 1 x 15cm x 24cm; 1 x 12cm x 24cm - these will be the three larger layers on the layout.
I have used the EK Success Binding Edge Punch on the bottom edge of these 3 papers.


Step #4: Select and cut your patterned paper for each of the smaller layers.
You will need:
2 x 11cm x 9cm and 1 x 8 cm x 9.8cm - these are the smaller layers on the left hand of the photo. I have added some page tabs to these layers using a staple.

Step #5: Feature Photo
Decide what photo you would like to use in the feature place. Cut to size and matt with cardstock or paper of your choice. My photo is 11.8 x 10.2cm

Step #6: Border
Find some paper that could be used for the border. I have used ruler borders from the paper. The other paper I have cut strips and then drew a zig zag free hand.

Step #7: Build Flap Feature
It would be wise to create each layer prior to it all being attached to the larger layout and prior to the layers being put together. It would be wise to mark where the layers stop so that you don't have photos and details hanging over. Avoid using 3D embellishments in each layer.


Step #8: Putting the layers together
When putting the layers together I made sure that I scored a half a cm line at the top of the patterned piece to aid with the folding and lifting of each layer.
Put the 3 papers for the larger 'lift the flap' layout together and then add the smaller 3 layers and the photo on the top. This could be a mini layout in itself.


Step #9: Attach the mini layout to the larger layout.


Step #10: Embellish the whole layout as you wish.


Materials I have used:
Patterned Paper: Creative Imaginations - Debbie Mumm - School Borders; Art Class; School Phrase; Smart Owlic. Cardstock - Bazzil; Coredinations - February Gold
EK Success Punch - Binding Edge; Kaisercraft - Tiny Alpha Stickers - Latte; Beary Patch - Sticker Letters - Funky Curl - Sun Beary; Cosmo Cricket - Tiny Type; Simple Stories - Year.o.graphy Cardstock Stickers; Tim Holtz Distress Ink - Walnut Stain; Black Cotton; Kaisercraft - Wooden Letters - Alphabet; Silhouette Cameo and downloadable images; buttons; black pen.

So what do you think? 
Great idea for including several photos and journalling sections in one layout I think. Make sure you let me know your thoughts...I love to hear them.

Have you entered your layout and card for this months challenges yet?
If not, you only have until the 14th to email yours to Jo for your chance to be crowned the winning layout/ card for the month....and maybe something a little special from Scrapbookit!

Have an awesome week and be sure to pop back in on the 15th for the next monthly challenge...

Until then,
Happy Scrapping.

Thursday, January 31, 2013

OTP - Debbie Mumm by Creative Imaginations

Hi Everyone, 

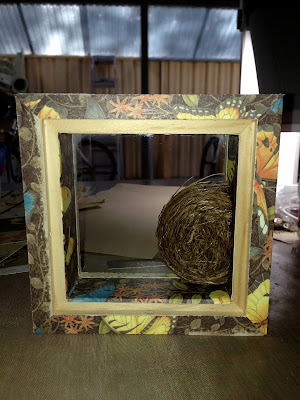
Rebecca back here again to share with you a small OTP project I created using the Debbie Mumm range by Creative Imaginations. I thought to myself this range is so interesting that I just had to go OTP with it, I created a small shadow box which I gave to my Nanna for her 80th Birthday (she loved it!!). 

Here you can see the finished box from the front, I have used half a nest and half eggs, all stickers have been foam mounted and I have hung a small pair of keys from the roof of the box. 
  

View from back of the box.

View from the right side of the box.

View from the left side of the box.

Below are a few photos I took along the way. Originally the small shadow box started off life looking just a balsa wood square. The following steps were then taken.
  • A matte gel medium was used to adhere all the papers to the box (all corners front and back were cut on a 45 degree angle). 
  •  Glossy accents was used to glue both the nest and eggs inside the box.
  • I decorated both the inside and outside of the backing. 
  • Small hooks were screwed into the roof of the box to hang the keys.
  • Lots of distress ink (Tim Holtz Walnut) and Gold Rub N Buff was used around the egdes. 
  • The back of the box was adhered with Glossy Accents (super glue would work perfectly well too).     


Thank you all for stopping by for a look, please do not hesitate to ask me any questions, I am more than happy to help out. 

Be happy and always be creative!

~ Rebecca ~ 


Monday, January 28, 2013

Admiration


Good morning Everyone,

Wow! It feels like such a long time since I have posted here...so much has happened in that time. Most importantly, I hope that you all had a wonderful Christmas and have started the year on a positive note.

I feel like I have big shoes to fill today…..Bec has set a wonderful challenge for us….to create a layout with torn paper, leaves, flowers and ribbon and the team have excelled and have shared some amazing pieces of work with you so far this month. 

Did you see Jo’s take on the challenge with the October Afternoon ‘Farm Girl’ range and her gorgeous set of cards?

What about Bec’s gorgeous 3 dimensional layout using one of the new Debbie Mumm ranges by Creative Imaginations and her very sweet Summer Lovin’ card?

Did you catch Janene’s gorgeous card using the Bo Bunny Love Letters Collection?

And finally Kerry’s layout using the lovely Carta Bella ‘Traditions’ and her Summer Lovin’ card Echo Park style?

If you haven’t seen these make sure you rewind and check them out by scrolling down……

Well, now it is my turn. I was so excited to receive my gorgeous pack from Jo this month. Like Bec it is also one of the new Debbie Mumm ranges by Creative Imaginations. 
Check it out….


The challenge for me was to actually complete the challenge…..my initial ideas for this range included school based photos...perfect for the paper….but of course these ideas didn’t fit the challenge that Bec set for us…...so I had to be a little creative!!
Here is what I came up with….


Materials Used: Kaisercard - Chocolate, Patterned Paper - School Phrase and Smart Owlic - Debbie Mumm - by Creative Imaginations, paper doilies, assorted ribbon, Ribtex Twine, buttons, cotton thread, eyelets, Staz On Black Ink. From my stash: Kelly Panacci Giggle Clear Stamps and Silhouette Cameo - leaf design. 


These photos were taken when we surprised my nieces when picking them up from Daycare. They were so excited to see their ‘big cousin’ - they just adore him!

I have used my Silhouette Cameo to cut the gorgeous leaf die cut shapes and the title ‘admiration.’ The flowers I have created using some simple circle shapes. I folded them in half and then in half again. I have used the buttons and cotton thread to hold them together.


For something different I have used eyelets for the ribbon in the top right hand corner. I haven’t used eyelets for so long - it was nice to pull them out of the stash again and resurrect them.


Janene also has set an awesome card challenge for us this month….create a card with the ‘Summer Lovin’ theme. Again, panic stations hit when I heard this and looked through my kit. I was really going to have to pull something creative together. I basically decided that I would have to represent love somehow and represent summer with bright, bold colours. Here is what I came up with…


Materials Used: Core’dinations - Rouge and February Gold cardstock, Patterned Paper - School Phrase, School Borders and Smart Owlic - Debbie Mumm - by Creative Imaginations, buttons,White Gel pen, Kaisercraft Rhinestones - Gold, Cosmo Cricket Tiny Type Alpha Stickers, Silhouette Cameo - leaf design.

To create the sun/heart feature of the card I drew the heart the size I wanted it. In the centre I drew a circle and then drew the rays in making sure that each shape was its own shape so they could be cut individually. Once cut I used foam tape and pieced the puzzle back together. Again, something a little different.


Well, I hope you have been somehow inspired to give our challenge a shot….you have until the 14th of February to email your entries to Jo - see the email link in the right hand sidebar.

And if you just adore any of the materials the girls and I have used this month remember to head to the Scrapbookit Online Store to grab them. 

Now before I go I just wanted to let you know to pop back again over the next few days to see what other projects the girls have created with their packs. I have seen a sneak peek of Bec’s next post - it is just gorgeous, I think that you will all love it. So make sure you pop back in to check it out. So that you don’t miss it make sure you like us on Facebook and get all of the Scrapbookit updates as they are posted.

Well, have a great week and happy scrapping,

Friday, January 18, 2013

Debbie Mumm Range by Creative Imaginations

Happy Friday everyone!! 

Rebecca here to share with you a couple of new projects created using the new Debbie Mumm range by Creative Imaginations. This range is fabulous for nature or autumn inspired work, the colour combinations in these papers are just gorgeous. 

This month I had the pleasure I setting the monthly challenge, I decided on the following:

Your project must have the following (in any amount you choose!! as long as all are included). 
  • Torn Papers
  • Flowers
  • Leaves
  • Ribbon 
For my layout I have used photos which were taken in the South Island of New Zealand last year, these photos I believe have the perfect colours to coordinate with the CI papers. This layout is definitely not a flatty, it is rather high with the use of the nest, glittered branch and butterflies. I could have chosen to stick the nest on flat, however to get the most out of my nest I cut it in half and used half on this layout (you will see the other half later in the month), the little eggs have also been cut in half using a small pair of sharp scissors. My stickers have all been mounted on foam tape and the edges have been inked. Metal leaves used throughout this project have been taken from my own personal stash (finally a wonderful project to use them on!).


Items used above - Creative Imaginations Debbie Mumm Range - Song Bird, Sweet Tweet, coordinating sticker set. Tim Holtz Distress Ink Walnut, kraft cardstock, Kaisercraft nest and eggs, Tim Holtz Tattered Leaves Die, glittered branch. 

This month Janene Selzer has set the card challenge with the theme 'Summer Lovin'. All my DT kit papers this month were very autumn looking, oh oh, what was I going to do?. I took my papers and created a scene with a floating butterfly and a sun. Who says summer cannot happen during autumn?


Items used above - Creative Imaginations Debbie Mumm Range - Song Bird, Sweet Tweet, coordinating sticker set. Tim Holtz Distress Ink  - Walnut, Spiced Marmalade, Peeled Paint, kraft cardstock, Kaisercard (Chocolate), Washi Tape - Bird on a Wire. 

Wishing you all a happy and most creative week :-)

~ Rebecca ~