Pages (Click Here to Visit)

Showing posts with label Thickers. Show all posts

Sunday, November 25, 2018

Our Little Bunny!


Happy Sunday evening everyone!

I don't know about you but my list leading up to Christmas is getting longer and every time I tick off something I add another ten things to the list.
I hope that you don't have the same problem and that you have enjoyed a relaxing weekend.

I'm here tonight to share with you a cute layout of my niece using this month's kit and challenge requirements. Have you entered our challenge this month?
Here is my layout...Our Little Bunny


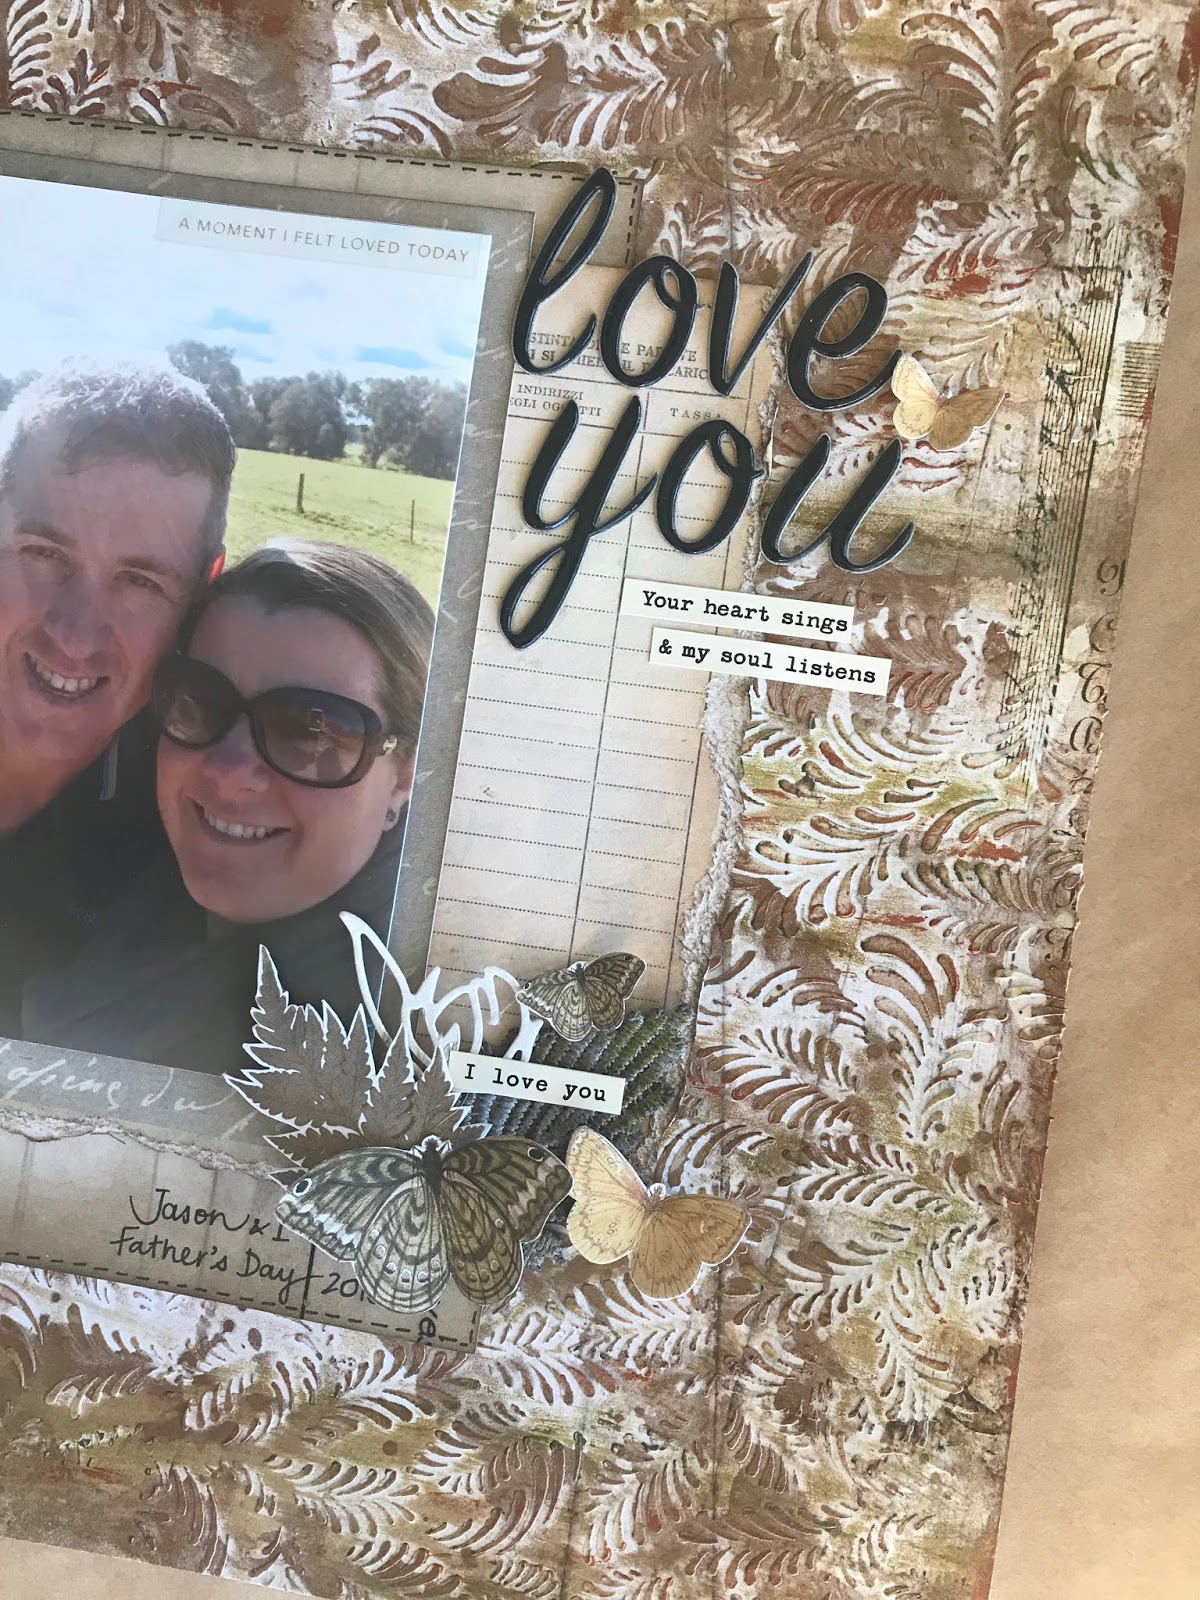
The photos on this layout just melt my heart. My niece is such a cutie...this was back when she was just a little poppet. She has grown into a gorgeous girl too!

For this layout I have used the Creative PL papers that our whole design team have used this month. It is so awesome to see how different our layouts all are even though we have used the same pack.
I have layered several of the papers from the collection to create the background.
I have slightly lifted the edges of these papers to create a simple distressed look.


I have backed the photos with tissue paper to soften the edges.
I used some Kaisercraft Mist ~ Aqua and some Vicki Boutin paint ~ Daiquiri Ice to splatter on the background after using some Gesso to soften the colours on the papers.


My favourite part of this layout is the writing on the photo. I was so nervous to do this, in case I ruined it but it turned out...and I love it! The little heart behind the writing is from the Amy Tangerine Sticker Book and the cute little aqua and gold heart are from the Heidi Swapp Stickers.


I have used the cute embellishments from the Creative PL - Hello Gorgeous Embellishment Stickers pack. How sweet is that little scooter?
The glitzy heart is from the Cocoa Vanilla Love Always Bits and Pieces collection and the little diamantes are as well.


I have also used some of the gorgeous Amy Tangerine Stickers under the flower embellishment...they are subtle and very nice.
I have finished with some Thickers - Rockabye for my title, a doily as well as some Heidi Swapp Stickers and a doodly border using a Staedtler Fineliner pen.


I just love how this layout has turned out...I'm really having some fun with all of the girly layouts that I have been creating of late.

I even covered off the challenge requirements...
Fun photo...well my niece was having fun with her bunny ears!
Flowers...yes I have some!
Five embellishments - flower cluster, scooter, heart, diamantes, doily or sticker elements!

I hope that you have your challenge entered...I would love a voucher at this time of year to spend at Scrapbookit...surely you would too???
Not long till entries close...so don't delay.

Hope that you have enjoyed our layouts and projects this month.
Be sure to check in on the 1st of December for our new challenge...looking forward to this one for sure!!!

Enjoy,
~Melx~

Monday, November 5, 2018

Fun Run!

Hello
I have a very bright and colourful page for you today! It is a photo from when my daughter competed in the Numurkah 5km Fun Run and managed to come second in the school girls section. Such a great achievement. Here's my Layout.

I have used a collection from Creative PL, I have started my layout with a very bright mixed media background, to make this I have used some Kaisercraft mist's in Denim and also some Art alchemy acrylic paint in pure sunshine and wild fuchsia. I really love these paints the colour is SO vibrant, I have just smeared these around the page.
Next I have used a lot of the different patterned paper and layered it underneath my photo's, I have followed Jo's challenge brief by using the word FUN several times on my page including the title, I have used my five embellishment's these being epoxy dots, gold stars, heart and star wood veneers, some fussy cut flowers and a tag with some string.  
 I had a lot of fun with this layout and used a lot of different techniques, colours and embellishment's, I hope that you all join in and have a go at entering this great challenge that Jo has set for us.
Mel will be up next with a layout, I can't wait to see what she has been up and what layout she has created for us!


Thanks for stopping by
Jane xxx

Monday, October 15, 2018

ADVENTURE & MUD

Happy Monday Everyone!!

Who can believe that it is the middle of October and more importantly that there are only 4 sleeps until our spring retreat!!!! Sooo excited to get away with like minded friends for a weekend of crafting!

Anyway, I am back today to share with you another layout for this months challenge using the Kaisercraft collection Mountain Air.
I have had a lot of fun this month creating with this collection. I love that there are a variety of options to choose in this collection. There are browns, maroons, greens, greys and blues.

For this layout I have chosen to use the blue and brown tones. 
Here is what I have come up with.


Another layout of my little man getting out and about, exploring and experiencing such incredible adventures. These photos were taken at the Australian Jamboree at Cataract Park, Sydney in 2016.

I have started with a blank piece of white cardstock.
I created the background using Tim Holtz Distress Ink (Faded Jeans) and Distress Oxide Ink Pads (Iced Spruce, Old Paper and Salty Ocean). I basically swiped them down the page and then just used water to blend them.

I splattered some sprays around the page including Colour Blast - Carribean; Heidi Swapp Colour Shine - Navy as well as some Tim Holtz Distress Resist Spray.

I used a background stamp by Hero Arts - Bold Brushstroke and some brown Archival Ink to randomly stamp around the page.


I have used some of the awesome new product Nuvo - Embellishment Mousse - Cornflower Blue through a Kaisercraft Mini Designer Template - Splatter.
Oh wow...I love this new mousse...it is A-M-A-Z-I-N-G!!!

I have been getting right back into using my Silhouette Cameo...for this layout I was dying to use this Adventure cut file by Simple Stories. I love how it turned out in the end.
I also cut my circular embellishments and the bracket frame with my Silhouette.


I have used some older American Crafts Thickers - Sunrise which I have inked in Distress Ink - Faded Jeans and then used Distress Powder - Vintage Photo Embossing Powder over the top.


I used a lined index card as my journalling card and have finished with some elements and phrases from the Element Sticker Sheet.
A little bit of doodling with my brown fine liner to bring it all together and it is all done.

Well, I hope that you have enjoyed seeing my latest project.
Be sure to get involved and enter your challenge project by the end of the month. Details on the right side of this blog page...who wouldn't want to win $30 to spend in store!!!!

Have a great week...and to those coming along to retreat...see you very soon!

~Mel~

Thursday, September 20, 2018

Love You


Hey Everyone...Mel here!

It is time again for me to share with you a project that I have been working on for this months challenge.

I have stuck to the challenge requirements for my second project this month.

Jane has set the challenge this month...
* We need to use the mood board for inspiration


* Use a mixed media element
*Use the word LOVE somewhere on your project
*Include some fussy cutting

Here is the layout that I have come up with...


Before I go too much further...let me tell you a frustrating story!

I had planned out my layout, then I completed the mixed media background. I allowed the background to dry...for about 4 or 5 days (only because I was so busy that I didn't get back to it).
I put the layout together and was really happy with it...that was until I saw the 'missing piece of patterned paper'
Have you ever completed a layout and after everything was stuck realised you left a piece off? Well, this was me with this layout!!!!! So frustrating.
Not much I can do about it now!!!


I have used the 49 and Market 'Vintage Artistry' paper collection.
To create the background I started by using some Moulding Paste and the 6x6 Kaisercraft template 'Fern'

Once it had dried, I used some Colour Blast - Colour Mica Powder - Espresso and some Colour Blast Shimmer Cube - Leather randomly around the background.


I also used the Tim Holtz Distress Crayon - Peeled Paint and the Prima - Art Alchemy - Antique Brilliance - Red Amber paste for highlighting.

I used some Tim Holtz Distress Ink - Walnut Stain around the patterned papers.

I fussy cut all the butterflies and the floral leaves and sprigs except the one left over flower I had from the last layout which was cut using the Uniquely Creative Metal Dies Bloom Outlines.


In my little embellishment cluster I have coloured a piece of fern from the Uniquely Creative Lace with some Leather Colour Blast Shimmer cube and highlighted with the Peeled Paint Distress Crayon.


I have finished my layout with my title....love you....which I have used some Thickers - Rainboots Puffy Letters for this. I have also added some tiny word stickers from Cosmo Cricket and Heidi Swapp's Memory Planner Stickers.

I hope that you have had a chance to enter this months challenge...it is a fantastic challenge!
If you haven't entered yet....hurry...you still have time...who wouldn't want a chance to win a voucher for the Scrapbookit store???

Can't wait to see your entry!
~Mel~

Tuesday, June 5, 2018

The 2 of Us

Good morning Everyone!

Many thanks for joining us here at Scrapbookit.

Today I am here to share with you my take on Jane's June Challenge.
Have you seen the requirements?
It is such a great challenge!

All you need to do is use:
*The Sketch
and 2 or more of the following:
*Washi
*Watercolours
*Stamps
*Stencils

Image result for pagemaps sketches

This month I am using the new collection by Kaisercraft 'Stargazer.'
It is quite a different collection for Kaisercraft but very lovely. 
I have loved using it for this challenge.

Here is what I came up with...


I giggled when I read Jane's post the other day...great minds think alike...we both used washi for the little flags!!! I have used some SP Washi and a few other washi tapes that I had.

I started with using my watercolours in a variety of different tones of blue and grey. I also splattered some Dylusions Ink Spray ~ Periwinkle Blue as well as the Dylusions ~ Black Marble around the background.


I have used the sensational patterned papers of this collection for the squares. It's not easy to find photos that you can trim to 2" by 2" size, so I printed my photos to the size. These were some selfies of us in Thailand earlier in the year.
It is a little hard to see in the photos but I have actually raised the photos. I just thought that by doing that they are now the focus of the layout.

I have decorated some of the squares with collectables or stickers from the pack. 
How gorgeous is the border sticker with the dots that I have used at the bottom of the larger square??

I added a little feature of the collectables in the corner (In my true style...it is my addition to the sketch 😬 whoops! I couldn't help myself!!)


In the collectables I found this gorgeous Mother Teresa quote. I love it...and so appropriate!

I have used the Uniquely Creative Clear Stamp Set - Have a Blast which contains the stamp 'You Mean the World to Me.' I just LOVE these stamps...they are very cool but most importantly they stamp so precisely! You should check them out!!

My journalling I printed from my laptop using the American Typewriter font!

Lastly, I used some American Crafts Foam Thickers from my stash called "Delight"


So in the end, I have used the sketch and all bar one of the extra requirements...

Now, all of these products you can grab at Scrapbookit...if you can't find them in the shop...just send Jo a message, she will get you sorted!
That Kaiser collection and those Uniquely Creative Clear Stamps are a MUST HAVE!

I hope that you have enjoyed checking out my take on the challenge today and make sure you pop back in as Jo's take is the next up in a few days! I'm sure it will be magnificent!!

Happy Scrapping Everyone!
x Mel x


Monday, June 5, 2017

Our Little Cherub

Good Morning Everyone!

Welcome to June!! 
I can't believe we are into the sixth month of the year and winter is here!!!

This month we have a fantastic challenge set by Jo. I love all elements of this challenge and it was super fun to have a go at.

This month's challenge is...
Create a project using 6x6 papers, geometric shapes and chipboard.

Here is what I have come up with...


I have used the cute paper pad from Photo Play "About A Little Boy" and have kept the 6x6 paper size to layer the papers and create a base for my photo.

Prior to doing this though, I created a background using a piece of cardstock which I covered with Gesso. I then splattered some KaiserMists in similar colours to the papers (I used Orange, Turquoise, Yellow, Charcoal and Coffee) around the background. I also splattered some of the gorgeous Art Alchemy Acrylic Paint - Opal Magic Blue-Gold around. I just LOVE this acrylic paint, the dimension it adds is just sensational!

I also did some stamping with a cool little Chickenwire stamp from Scrap-FX and Archival Ink in the Watering Can colour.


For my chipboard element I have used the 2 Crafty Fiddlesticks Panel Chipboard. I have made this part of my background by cutting the chipboard in two pieces. I have adhered it to my background and covered it in Gesso prior to my splattering and stamping. I love how this element worked on my page.

The thing I loved most about this Photo Play paper pad, other than being able to get back to some gorgeous baby photos of my boy, was that there were some very cute element pages that you could trim up and use as features on your pages.


Finally, the geometric shape component of the challenge for me is covered in many places. First of all each of my 6x6 pages is obviously a square and that gorgeous chipboard element has so many geometric shapes. 
The other way that I incorporated this element was I found some old One Heart One Mind - Buckle Up and Ties in assorted square sizes in my stash. These worked well I thought!

I have also included some enamel dots from the Life is Beautiful ~ Cocoa Vanilla collection.


I finished my layout with a title using American Crafts Thickers - Delight Fabric Letters and my own handwriting.


I love how this has all turned out and another cute layout for the baby album.

All products used here are available at Scrapbookit. Just jump online to place your order or email Jo at joanne@scrapbookit.com.au!

Have you thought about how you are going to tackle this challenge??
Can't wait to see how you do!

~Melx

Monday, February 1, 2016

FEBRUARY CHALLENGE IS HERE!

Welcome to February and to our brand new challenge!

It was so wonderful to see so many gorgeous entries into last month's challenge. We hope this month's challenge might inspire you just as much to enter your projects.

This month we have gone with a challenge that is a little different.

A CHALLENGE GRID!

For this challenge grid you are required to use 5 of the 9 items/products/techniques in your project.
That is it!
Nothing more to it!

I have started the month with a couple of projects for this challenge.

I have been playing with one of the newest editions (released today and available at Scrapbookit) to the Kaisercraft collections! 

Coastal Escape

Another great collection for your beach and holiday photos. I really enjoyed using the collection. I love the blues and aquas of the papers.

My first project to share with you today focuses on the blue tones in the papers.

The 5 items/products/techniques that I have used are:

* Ripping and Tearing
* Distressing
* At least 5 different patterned papers
* Texture and Templates
* Stamping

Here it is...


I started with a piece of cardstock I have had for many years. It is embossed!
To create my background I used some of the new White and Aqua Kaiser Mist to spray. I then used the dotty template from the Kaiser - Quarters templates and some Dylusions Paint - White Linen to add a small amount of dots in the corners.

I used the Dusty Attic Chipboard - Fish Net as a template and some Moulding Paste to create my texture. I dragged an old credit card through the moulding paste to create a different effect and take away the clinical looking shapes from the fish net template with the moulding paste.
I then used some Dylusions Paint - London Blue on the edge of the credit card to criss cross a hatched effect over the moulding paste.

I then stamped with the Kaisercraft Clear Stamps - Hessian and Wood Grain.

Here are some close ups!


As you can see the cardstock and the 5 patterned papers I have used I have torn and distressed.
My embellishments are the Scrap FX Take Aim chipboard and the 2Crafty Chained Circle chipboard.
I have also used some the blue coral from the Coastal Escape Collectables.

For my title I have used the Thickers - 'Rockabye' by American Crafts. They were getting lost as the soft aqua colour so I decided to ink them with my Archival Ink - Black.
I do like though how the aqua colour appears on the edges still.


The second project I have to share with you today is also using the Coastal Escape collection by Kaisercraft.

I have used the following 5 techniques/products/ideas from the Challenge Grid...
* Texture and Templates
* At least 3 embellishments
* Bursts of Colour
* At least 5 different patterned papers
* Washi Tape

I also tested a technique shared by Cathy Cafun on the Kaisercraft Blog. It is her Cling Wrap Mist Tutorial. 
I used this to create my background.

Here is my canvas...


I started by applying Transparent Gesso on my canvas.
I then applied pools of White, Aqua, Denim and Turquoise Kaiser Mists as well as the Heidi Swapp Colour Shine - Teal mist. I think this is definitely bursts of colour!

Here is the link if you would like to check out how to create this effect using cling wrap

I used the Kaiser Quarter Template - dots and some Gel Medium as my Texture and Templates.

I have used the Dusty Attic Chipboard - Fish Net, that I used in my first project as a template, here on this layout as an embellishment. It even still has moulding paste on it, nice pre-loved look to it.


I have also used some collectables from the Coastal Escape and some old recycled beach themed embellies from my stash.

I have my 5 different patterned papers and my strip of the NEW Kaisercraft Glitter Tape - Ice Blue.


Well, if you got through that post - well done! It was a detailed one!
Hopefully something in it that you can try out or at least an idea for your next project!

Make sure you give our challenge a shot this month. It really is very open ended and open to interpretation. We love seeing your creativity!

You have until February 28th to get your entry linked onto the blog or emailed to Jo to be in the running to win a prize pack and the chance to be a Guest Designer for a month at Scrapbookit!

Really excited to see your interpretations this month...I can't wait!!!!!

Melx

Sunday, December 7, 2014

What a Find!!!!!!

A month of celebration at Scrapbookit!
How exciting and what a great challenge? Thanks Lynn for a great one.

This months challenge has the 'celebration' theme.
There are a few components to this challenge...
1) Use the words/s - celebration, congratulations or fun on your layout.
2) Follow the sketch

Here is the sketch...

Here is what I came up with...


This photo was taken in Singapore. Not even two hours into our stay in Singapore 
and I found this scrapbooking shop...that is cause for complete celebration!!!!

I have used the following items, all available from Jo at Scrapbookit.

Paper: Kaisercraft - Pop! Collection, Cardstock: Kaisercraft Coconut
Prima - Colour Bloom - Antique Gold Spray Mist; Clear Stamps - Stains; VersaMark - Watermark Ink; Lettering: Thickers - Corrugated card shape - Hugs - Leaf; Ribtex Inspired by Nature - embellishments; Flowers; Metallic Melts - Glistening Snow; Distress Ink - Peeled Paint and Wild Honey

A couple of details

And another....


Sorry my post hasn't been a long post today....
but I am right in the middle of writing school reports!
My brain has stopped functioning "normally"!!!!!

My only hope is that this inspires you to want to join in with the challenge!!
Can't wait to see your take on this challenge.

Until next time,
Melx