Pages (Click Here to Visit)

Showing posts with label Faber Castell Gelatos. Show all posts

Thursday, December 20, 2018

Christmas ~ Merry and Bright


Morning Everyone!

Who can believe it is only 5 days until Christmas Day?? I know I can't!
I hope that you are all prepared and ready for the big day.

It is so much fun ticking off some Christmas layouts...
thanks, Jane for the great challenge!
Whilst I haven't followed the challenge rules for this post I still have used the gorgeous Simple Stories Christmas Collection, 'Classic Christmas'

Here is the layout that I have created...


I started with a piece of white cardstock and using my Faber Castell Gelatos I have created some varying sized circles in green, red and gold. I used some water and a paint brush to blend the colour.

The gold circles (which doesn't show in the photo) have also got some gold Colour Blast Shimmer Cube colour on them to make them shimmer!
I have also used the shimmer cube for the tiny flecks of gold around the background.

Other than that my layout is reasonably simple...some layered patterned papers as well as some sticker embellishments from the Simple Stories 'Classic Christmas' collection.


I finished with the boy's names and the date using my date stamp!

I have also created another layout using this collection.
It has been a while since I have used a piece of Kraft cardstock for my background but I have enjoyed revitalising my love of Kraft!!


Surprisingly (not!) I haven't been able to leave the background and I have added some paint.
I love these paints, they leave such a gorgeous look on your projects. They are the Art Alchemy Acrylic Paint in Metallique Rusty Red and Metallique Steampunk Copper!
I have also used the Gold Colour Blast Shimmer Cubes to create some little star shapes. I outlined these with a brown Stampin' Write Marker. I have also used some Gold Kindy Glitz in the centre of the stars.


Another simple layout making use of paper layers and stickers to embellish.
How gorgeous are the little bits of foil gold on the patterned paper?
This collection is truly divine!


Well, I just wanted to finish up by saying a huge thank you to Jo for her generosity, friendship and belief in me again this year. Jo is so very generous and a true inspiration to those of us on the design team. So thank you Jo...I hope that I have done the kits, collections and products justice.

I also want to thank Jane. It is so much fun having someone to create with. Your projects are gorgeous and you inspire me everyday!

Finally, thank you to everyone that continually supports us here at Scrapbookit...popping in and checking out our blog posts, entering our challenges and supporting the shop...we truly appreciate all of your support!

I hope that you all have a very Merry Christmas and a very successful 2019!

~ Melx~

Sunday, July 1, 2018

A New Month and a New Challenge!

Welcome to July!
Another new month and another new challenge, which I can't wait to share with you all.
Isn't the year flying???

Are you ready for a new challenge?

For this month our challenge is to....

1. Use the Page Maps sketch below.
2. Include each of the Grab 5 requirements in your project.

Grab 5 requirements:
1. A mixed media product
2. Stickers
3. Embellishments - flowers, stars, hearts.....
4. Fibre - cotton/thread/ribbon/twine....
5. A household item to create texture - bubble wrap, dishwashing sponge, napkins....


I had an absolute ball creating my first project for this challenge.
Not only did I have the challenge requirements but my kit that I received was very florally!
But OMG...I LOVE it!!!!

Here it is...


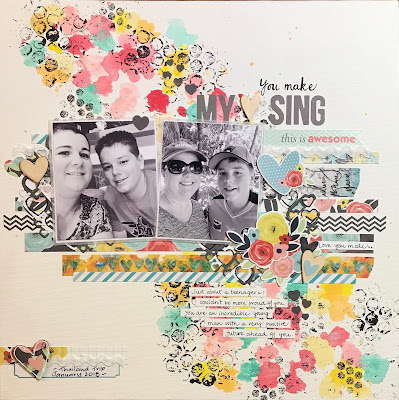
My project is actually a 12x12 canvas!
I started with a very thin layer of gesso to try and hide a stain on the canvas.

Just recently I was watching a Vicki Boutin Friday Night Live and Vicki was using her Art Crayons to create a background using the drop technique (I think that is what it was called).
It was very cool so I tried to recreate the technique but with using my Faber Castell Gelatos. How cool are the colours?

I added some black acrylic paint dots with two different sized bubble wrap.

I have used the gorgeous Simple Stories 'Welcome Spring' paper collection and cardstock stickers for my embellishments and paper strips.


I have also used some of the Dina Wakley Media Washi tape as some of the strips in my background.

I have backed my photos in a thin tissue type paper that I have collected from a bunch of flowers I was given.


I have added a few wood veneer hearts alongside my little clusters of embellishments.


I have hand written my journalling and have also hand written part of my title You Make My Heart Sing! The sticker letters are from an old Kaisercraft collection Sticker Sheet - Happy Snaps!

Can you see the gorgeous little die cut behind my photos in two places?
This is an awesome die!! Not only do you have the sweet little heart wreath but you also have a variety of different sized little hearts that come just from one cut! Such a great die cut!

I have added some of the little hearts around my project.


All of the products that I have used (listed below) are available at Scrapbookit. If you can't find what you need be sure to send Jo a message and she will sort it for you.

Products Used:
Gesso
Faber Castell Gelatos - Red Cherry, Metallic Melon, Metallic Mint, Mango, Guava, Butter Cream, Lemon
Bubble Wrap
Black Acrylic Paint
Simple Stories - Welcome to Spring Paper Collection
Dina Wakley Media Washi Tape
White Rik Rak
Uniquely Creative Metal Die - Heart Wreath
Posca Pen - Black
Wood Veneer Hearts
Kaisercraft - Happy Snaps - Sticker Sheet - Alpha
Simple Stories - Welcome Spring - Cardstock Stickers

Don't forget to get cracking with your challenge entry. It seriously is a really fun challenge and worth a shot! There is a super prize up for grabs at the Scrapbookit shop, I can't wait to see what you create!! Entries close at the end of July!

Well I hope you have been inspired by this challenge and by my project!
~ Melx~


Wednesday, January 18, 2017

Journal Page - Good Times!

Morning again everyone!

I am loving this Amy Tangerine ~ Oh Happy Life paper collection. So much so that I just can't stop using it!!!!
Today I am here to very quickly share with you another project using this gorgeous paper collection.

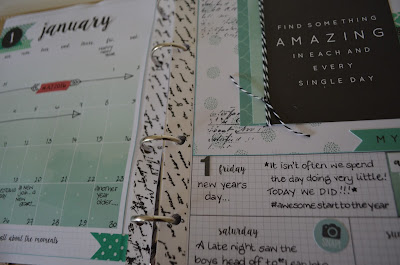
I am playing a little bit of catch up with my 2016 Journal Planner. But I am having fun while I do it. I have done so much more than I ever envisaged I would at the beginning of 2016...whilst I had all good intentions.
Anyway, I have used the Amy Tangerine paper to create this page in my journal planner.


I just love how bright it has turned out!!
Alongside the Amy Tangerine papers I have used lots of mixed media products to create.
The first thing that I did to my blank page was use the large circles quarter from the Kaisercraft Grunge Designer Template with some Gel Medium.

Then using the same template I used the Lipstick Colour Blast Colour Paste.

I used the Kaisercraft Bubbles 12x12 Template and the Singin the Blues Colour Blast Colour Paste randomly around the page.

Finally, I used the circle quarter from the Kaisercraft Mixed Media Designer Template with some Envy Colour Blast Colour Paste.

I made sure that between each of these layers I dried the product before continuing.

I then used some Sunflower Colour Blast Shimmer Dust over the top and then dried this off too!


I did some really random stamping using the Kaisercraft Tic Toc Clear Stamp and Archival Ink.
I finished the background off using some white and black Faber Castell Gelatos to add some dimension to my Lipstick coloured circles.


A few different papers and some inked edges and my project is complete!

Maybe you would like to submit a project similar to this in our January Challenge?
You are only limited by your imagination!

I still have another project to share with you, but you will have to pop back later in the month to check that out!

Until then,
xMelx

Wednesday, June 29, 2016

Boys Will Be Boys

Afternoon Everyone,

Can you believe that it is the second last day of June?
Where has this month gone?

Just thought I would pop in this afternoon to share another layout that I have created using the Cocoa Vanilla Studios collection 'Totally Rad'

This layout was a little bit of a work in progress.
I was fiddling with the background, trying a few techniques.
I wasn't overly happy with the background and sort of shoved it aside thinking that I didn't like it and that I would never use it. After a bit of paper shuffling I have used it and have come up with this layout... (I apologise about the shadows!)


To create the background I did a couple of things.

The first thing I did was... using the Kaisercraft Bricks 12x12 template, my Faber Castell Gelatos and some baby wipes I created the water colour brick wall effect using both orange and black.
All I did was add the Gelato colour to the baby wipe and wiped it through the template onto the card stock.

The second thing I did was used some texture paste. I used it with a template, Kaisercraft Quarters as well as just by smearing it onto the card stock.


Next I used some of the 'old' Kaisercraft Rub-Ons that I have hoarded away for ages. I tried to use some of them up in the background and wasn't worried if they didn't quite work so well. Adds to the grungy look.

Then I used my Gelatos in the yellow and orange and just randomly applied it over the water colour and texture paste. At some points I blended the Gelatos with my finger at other points just left it.


Finally on the background I splattered some charcoal coloured mist. 

To complete the layout I have added strips and blocks of the gorgeous Cocoa Vanilla collection, which I have inked with Distress Ink.
A few little embellishments from my kit - the sensational flairs and the very versatile wood veneers - and my layout is done.


Don't forget to book in for our Spring Retreat...October 7-9 2016!
A wonderful weekend of friendship, fun, laughter and yes of course scrapbooking!
Look forward to seeing you there.
Payments and bookings can be made by visiting our website 
www.scrapbookit.com.au

Be sure to check back in on Friday for our new challenge and a new Guest Design Team Member.

xMelx


Sunday, June 26, 2016

Morning Everyone,

Thanks for popping in today to Scrapbookit to see what we have been up to.

I'm here today to share another post with you using the sensational Cocoa Vanilla 'Totally Rad' paper collection.

I haven't followed the challenge requirements for this one but am here to remind you to make sure you get your challenge entries in. You only have a few days left! We have a sensational challenge that the lovely Jane Garner has designed for us. It is one to warm you up on these freezing days! All you need to do is follow the following elements in your project.

Element #1: Use the word SUMMER on your project.
Element #2: Use TEXTURE and TAGS
Element #3: Use the colour YELLOW
Element #4: Use the SKETCH below


Now for my project!

I have created a very masculine, messy layout!
Here it is...


I have used as I said the gorgeous 'Totally Rad' paper collection by Cocoa Vanilla Studio. Isn't that 'Say What' paper in the background awesome?

I have added some texture and "mess" using gesso, one of the Quarters Templates by Kaisercraft, Faber Castell Gelatos - Mango Mango and Earl Grey, Kaiser Mist - Denim, Kaiser Ink - Black, IndigoBlu - Ink Splats stamp and Colour Blast - Colour Embossing Powder in the gorgeous Dusty Charcoal.

I have used the embossing powder on the WOW chipboard frame. It is very cool. Check out the close ups below.


I have also used the Cocoa Vanilla Studios - Wood Veneers and Flair Buttons. I have embossed the wood veneers with the embossing powder as well.


I have also used this collection to create two little cards.

I decided to leave the 'Say What' card with a blank place to put a number. I'll add the appropriate age number when required.
How cute are the Cocoa Vanilla Acetate Stars?


Well I hope you have found some sort of inspiration from my post today. All of these gorgeous products can be found in store at Scrapbookit or Jo can order them in as well.

Don't forget the challenge and be sure to book your spot for our Spring Retreat by contacting Jo ASAP - seats are filling fast!

Have a great week!
xMelx

Saturday, May 21, 2016

Live Life Happy Everyday

Morning Everyone!

I'm here to share with you two quick projects that I have been fiddling around with.

If I have learnt anything over the last fortnight it is definitely to...
"Live Life Happy Everyday"
We just never know what is around the corner do we?

Here is my first project...


I have used a tin from the yummy Rondoletti - Cafe Style Cream Wafer treats. I love projects when I have been able to upcycle. For those of you who have never heard of upcycling it is when you reuse items and create a better product.


I have clustered some different Kaiser Blooms together here. The larger flower I used a paint brush and some Kaiser Mist to paint my flower the colour I required it.


Here are some close ups of the papers and corner features I have created.


The products I have used to create and upcycle the tin were:

Simple Stories - Vintage Bliss paper collection; Kaisercraft Black Ink; KaiserMists - Turquoise, Winter Grey, Charcoal and Candy ; Kaiser Paper Blooms - White & Hot Pink; ; SP Washi Tape; Colour Blast - Colour Paste - Envy and Steel ; doily and Mod Podge.

I have also created a card using the IndigoBlu - Flutterby Stamp. After stamping the butterfly with Archival Ink I sprayed the butterfly with Kaiser Mist - Candy and Colour Bloom - Cotton Candy. 


To create this card I used some tissue paper and Mod Podge to begin with. I have then layered some sprays - Kaiser Mists - Winter Grey, Charcoal and Candy. I also layered in some Colour Paste - Steel and Gelatos. 
I have stamped the 'You Are Beautiful Inside & Out' from the Kaisercraft Sea Breeze Stamp Collection.
A quick and simple card to create!

I hope that you have found something today to inspire you to want to create this weekend.
Why don't you join in our monthly challenge?

This month all you need to do is create a project that has some reference to things with wings.
Here is a little prompt to help you with your ideas...

You have until May 30 to get your entry linked into the blog side panel or emailed to Jo.

Remember to Live Life Happy Everyday!

xMel


Friday, March 25, 2016

Another from Magnolia Lane

Good morning Everyone!

I'm back again to share with you another project using the gorgeous Magnolia Lane collection.

Just a quick post this morning, today is Good Friday and I have a busy Easter weekend ahead...as I am sure that you do!

For this post I have created a framed piece. 
One of my favourite gifts to give is a framed paper craft item. I have created this one with my Nan in mind. I have used a decorative frame from the Reject Shop.

Here is my project...


Materials I have used:
Magnolia Lane Paper Collection - Ultimate Crafts; Gesso; Kaisercraft Stamps -  Honeycomb, Script   and Windsor; Faber Castell Gelatos; Kaiser Mists - Charcoal, Winter Grey and Candy; Archival Ink - Black.

I started with a piece of the gorgeous paper from Magnolia Lane.
I cut it to size making sure that I took notice of what elements I wanted in my corner...how gorgeous is that bird cage feature.

I used gesso, stamps, mists, my gelatos as watercolours, stamps and inks to create a very mixed media looking background.

I then fussy cut some butterflies and some flowers from the paper collection to create the clusters at the bottom and in the top left corner.

I have used one of the quote cards from the paper collection and instead of using it as a whole block I have cut the words up.

Something very simple and very pink (for those that know me well I have defied the odds of creating more pink projects!) but I just love how it all turned out.

I hope that the Easter Bunny is good to you on Sunday and that he brings lots of yummy eggs!
I'm hoping to get some creative time in over the weekend - I hope you are too...you still have time to enter our challenge using this gorgeous mood board and the word Cherish.


Happy Easter!
Melx


Sunday, March 20, 2016

Mixed Media Canvas

Good Afternoon Everyone and thank you for popping by to check out our blog!

This weekend we have had our Autumn Retreat in Bright. All of the ladies have had a wonderful weekend. 

Yesterday I was lucky enough to create with Beck Beattie #getcreativewithbeckbt
We participated in three classes with Beck where she shared some techniques and some gorgeous product from IndigoBlu, Faber Castell and of course her own products from Tinby Designs. This included being treated to using some exciting new products that are just about to be released. It was such a fun day. Thank you Jo for organising Beck to come along and thanks to Beck for three great classes. You can see some of the snapshots from the day on Instagram or Facebook by following our Scrapbookit pages, the tag #scrapbookitautumnretreat2016 or through Beck's pages. 

Now that I have shared all of that exciting information it is my turn to post. I haven't followed the challenge requirements for this month for this my second post. But make sure you check out our challenge. Delsie, our Guest Designer for this month, created a gorgeous mood board for the challenge. All you need to do is create your project, add the word Cherish and send your layout to Jo or link your layout to our blog. Make sure you get your entry in by the end of the month!

I have been creating with Magnolia Lane this month. I have 2 projects to share with you...a card and a canvas that I created last night using some of my learning from the classes yesterday with Beck. 

Here is my card...


I created this card for our neighbours who have just recently lost their husband and dad in a farming accident. 

I have used the Magnolia Lane papers which included a few elements that were fussy cut from the papers, The Dusty Attic - Dusty in Bloom Bridal Veil Flowers, Kaisercraft Paper Blooms and Flourish With a Bling Pearls. 

I didn't have alpha letters with the script font that I required so I decided to chance it and handwrite my sentiment. Whilst not perfect, it didn't turn out that badly in the end. I will look at it as a personal touch.

Yesterday Beck ran a canvas class with us. I will leave Jo to tell you all about it however I came home and was inspired to create.

So I pulled out a canvas and whilst disappointed I couldn't create with all of the same product we used in the class I decided to use whatever I had to try and create something similar.

Here is what I came up with...


I have used Mod Podge, the colours from the Mood Board as my base, Faber Castell Gelatos, Gesso, Kaisercraft Paper Blooms - assorted, Quote is from the Magnolia Lane paper collection, twine, black wire, Kaiser Mist - Antique Gold and Charcoal, Tinby Designs - Metallic Melts - Gold Nugget, Kaisercraft Wood Flourishes - Frames, Archival Ink - Black and Darkroom Door - French Script.


I really enjoyed creating this. I loved thinking back to Beck's class and creating something to go back over what we had done. The thing I loved most was...there are no mistakes - everything can be covered over (well, almost everything!).

I hope that you have enjoyed reading my post today.

Don't forget to get your entry for this month's challenge in by March 30th and if I don't pop in again before the end of the week make sure you have a happy, restful and relaxing Easter break!

Happy Easter Everyone!
Melx

Thursday, January 21, 2016

My Year My Story

Good morning Everyone!

Isn't January just flying? 
Being a teacher, this time of year is always an exciting time...a new class, new ideas and new challenges. This year I have added a change of school to the mix!
Won't be long and we will be back at it for yet another year!

Exciting stuff happening here at Scrapbookit too!
New paper collections, new products in store, a new retreat (with Beck Beattie tutoring), new challenges and new ideas. What is there not to love about our craft???

As you saw in my last post, I have been using the Kaisercraft collection 'My Year My Story' this month. I was so very lucky to receive, from my gorgeous friend, a Kaisercraft Journal Planner for Christmas. I was sooooo excited! 
There is nothing more satisfying then being organised!
However, I have decided to use my Journal Planner as more of a reflection of what has been happening in my world...something else that I love to do!

So I thought I would share with you the beginning few pages of my Journal Planner...I'm loving it!


Something that I have tried to do this month is use the 'My Year My Story' papers on layouts. If you are not the Journal Planner sort of person but just LOVE the papers then you have plenty of options.

For this layout, 'So thankful for this because...',  I decided to only use the black and greys from the papers. I wanted to bring in the blue from my mother in laws shirt and obviously the other colours in the collection were not going to work.

Here is my layout...I haven't followed the sketch for this one!


I started by creating my background by spraying with the Prima Colour Bloom - Cobalt spray mist and the Kaisercraft Honeycomb 12x12 template. I then used some Gel Medium (which dries transparent) and the template to highlight some of the honeycomb pieces.
I then lightly and randomly sprayed one of the new Kaiser Mists - Aqua.

Have you seen the new Kaiser Mist colours? Oh wow! They are gorgeous. Make sure you pop in to Scrapbookit to grab some...or order them online at the Scrapbookit Online Store!

I used a Kaisercraft Clear Stamp - Honeycomb and randomly stamped with black ink.

As I previously said I used the black and grey papers from the collection. I have inked them using a Kaisercraft black ink.

The spotted paper is a bit of a different story. I wanted another piece of paper and there was nothing that was working. So I decided to alter the spotted gloss design specialty paper from the 6x8 Paper Pad.
I didn't want to spray it as I wanted a more solid effect to offset the other dark paper. So I used my black Gelato to cover the page. Once I covered it I gently wiped over it with a piece of paper towel. This not only made the spots pop but also assisted with the opaque look achieved.


The gorgeous little butterflies and chicken wire chipboard is a WOW product. It is just gorgeous!
I have cut it into two pieces placing one as a feature on the left hand side top corner.

I wanted the butterflies to not only pop but to also bring in the more cobalt outline of the butterflies on my mother in laws shirt.
So I did two things to the butterflies.
The first thing I did was to paint them using the Lindy Stamp Gang product 'Magicals'
These are non toxic dye based powered pigments. I used the gorgeous 'Bachelor Button Blue'

The second thing I did was cover the butterflies with tiny little cobalt beads.
I am very happy with the result.

Here are some close ups...


Finally I added some small flowers to the chicken wire.
I wrapped one strip of paper with black wire and added why it was that I was thankful (my journalling).


All in all I am pretty happy with the result...not to mention the fact that I have a layout of the hubby's family (very rare that there are even photos!)

So, why not gather your collection of 'My Year My Story', or if you haven't got one order it today from Scrapbookit, and scrapbook that photo, moment, time, person that you are thankful for.
You could even give our challenge a go for the chance to win a prize and be guest designer for a month!
Make sure your entry is linked or emailed to Joanne by the 30th of January to be in the running!

Can't wait to check out your creation!

Melx